Multi-Language Add-In for Visual Basic 6
Quick Tour
Activating the Multi-Language Add-In
After you have installed the Add-In, there will be a new menu item in the Add-Ins menu in Visual Basic.

This menu item activates the Add-In and shows it in a tool-window. Like other tool windows in Visual Basic, you can dock this window at any side of the main Visual Basic window. It's probably best to place it at the bottom, in a wide format.

You may close the window at any time and reopen it using the Add-Ins menu.
Selecting a project
In Visual Basic, you may work with a project group containing multiple projects. However, the Multi-Language Add-In always works with a single project. To get started, you must first select a project. There are two ways to do this.
| from a dialog | When you select the Add-In from the Add-Ins menu, it will probably show a list of the projects in a dialog. Simply select the project and click on OK. 
This dialog can be disabled, so if somebody else has already worked with the Add-In, it might not appear. |
| from a drop down list | At the top of the Add-In's main window, just below the toolbar, there is a drop down project list 
You can select a different project at any time from this list. |
Initialising the project for localization
|
When you select a project for the first time, you must specify what the original language of the project is. You can select the language from a drop down list containing all of the languages supported by Windows. It is also possible to specify a non standard language, but this is not recommended. |

|
| <project name>_ml.mdb | This is the project database used by the Add-In. It is added to the project as a related document. |
| mlstring.vb | This module contains support functions, in particular the function ml_string(), which is used to load localized strings. |
Scanning the project
The Add-In will now scan the project. This is performed in two phases:
- scanning source code
- scanning controls
In the first phase, the source code of the project is scanned for texts which may require translation. In the second phase, the controls in each Form, UserControl and UserDocument are scanned for properties containing strings.
The results of the scan are displayed in two separate grids in the Add-In's window. You can switch between these grids using the tabs at the bottom of the window.

The controls database
At this point, you may see one or more error messages in the Errors tab.
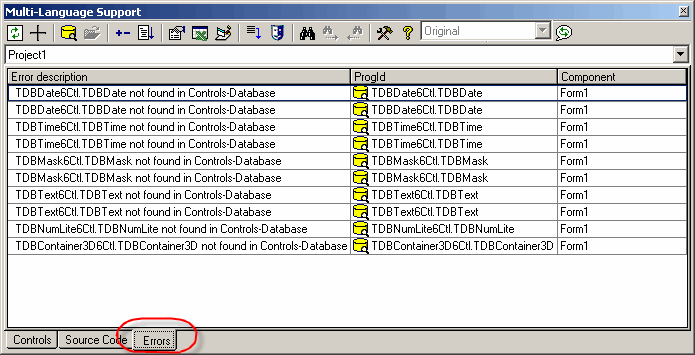
For example, the screenshot shows the error message TDBDate6Ctl.TDBDate not found in the Controls-Database. This error is easy to fix, but first we must take a look at the Controls Database.
You may already have wondered, how the Multi-Language Add-In knows which properties require translation and whether it is restricted to a small number of common controls. The Add-In uses a database to store details of which properties may require translation. The initial version of this database contains the standard VB controls and some of the most commonly used controls. It is easy to add additional controls to the database yourself.
The error message shown above contains a shortcut to add the control to the database. Simply click on the yellow database symbol  to open the database editor. The first time you click on this symbol, a form will appear while the Add-In build a list of available controls. After this, the controls database editor will be opened for the control indicated in the error message.
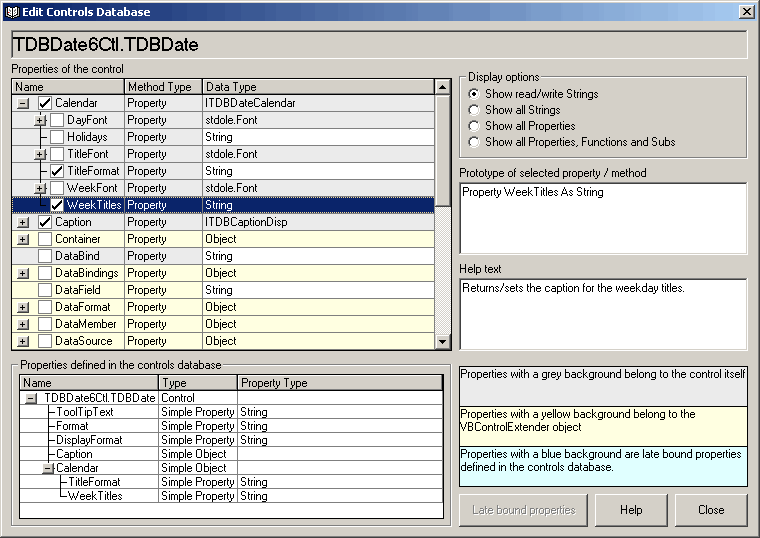
The list at the top left hand side shows the string properties of the control, plus additional objects which may be expanded to show additional properties. In most cases, you simply have to select the properties which require translation and close the dialog with the close button.
The list at the bottom left hand side shows the properties which have been selected. You will usually need some knowledge of the control to determine which properties require translation. (In the specific case shown TDBDate6Ctl.TDBDate, I have no idea which properties really require translation.)
After updating the controls database, you must rescan your project, before the changes take effect.
The database format is very flexible and can handle all of the following cases:
| Controls with no localizable properties | The Add-In will show an error message for each unknown control. It therefore makes sense to add controls to the database, even if they do not have any properties which require translation. |
| Simple text properties | The most basic type of property. Text properties may be selected at the top level, or an child properties of objects and collections. |
| String arrays | In some cases, strings are stored in an array property. In this case, you must specify

|
| Simple objects | In some cases, a property may returns an object, which in turn has text properties. In order to select the text property, you must first select the object property. The controls database then defines a hierarchical structure of properties. 
|
| Collections | Many controls, such as a toolbar, status bar or tab strip, contain object collections. For example, the ToolBar control contains a collection of buttons, each of which has a Caption and a ToolTip property which would require translation. In fact, a each toolbar button may have a collection of button menu items, each of which has a text property. 
Collections in VB usually start with the index 1, but there are some exceptions, for example the Columns collection in the DataGrid control. 
This is important for the Add-In, because it the items using the Item property (rather than the for each mechanism). |
| Object arrays | Sometimes a property may be an array of objects, but not actually a collection. As with an array of strings, you must specify a property specifying the array size and define the index of the first item. For example, the Sheet property of the GridWiz control is a zero-based array of objects. The size of the array is defined by the NumSheets property. 
Here you can see additional trick, to access the Cell property of the Sheet object using the fixed value of 0 for the first parameter. In this case, it refers to the column headers in a grid. |
You can view the complete contents of the controls database, by clicking on the yellow database symbol  on the toolbar. From this view you can add new controls to the database and edit existing items. In addition, you can open the controls database editor for a specific control via the context menu in the controls grid.

Adding a second language
To add a new language to the project, click on the  symbol on the Add-In's toolbar
 |

|

|
This brings up a dialog with which you can add a new language to the project. You can select a language from a drop down list showing all of the languages supported by Windows. Then simply click on OK to add the language to your project. If you wish, you can initialise the texts in the new language based on the texts for another language, but this is not recommended. |
- add a new column to the grids for the new language
- search for translations of common texts such as OK and Cancel in the Global Translations Database
Now we will take a closer look at the two grids.
The controls grid
To see the controls grid, make sure that the controls tab at the bottom of the window is selected. The grid should look something like the following screenshot.

By default, the properties are shown in a hierarchical manner, showing the association of properties to controls. As an alternative, you can view the properties on each Form, UserControl or UserDocument in a flat list. To select this mode, click on the  button on the toolbar and then select Flat list from the menu.
 |

|

To enter a translation, simply click in cell and type in the new text. If you are able to translate the text yourself, this is the easiest way enter translations.
The check boxes to the left of the property name indicates that the text has been selected for translation. By default, all properties which contain a non empty string are selected. In the screenshot above, you can see two menu separators with the text "-". It makes no sense to translate these, so we can remove deselect them by clicking on the check boxes.

By default, properties containing empty strings are not shown in the grid. It very rarely makes sense to translate empty strings, so this if sensible setting. If you do want to see properties containing empty strings, then you can modify this option in the settings dialog. To show this dialog click on the settings button  on the toolbar. Details of this and other options are described in the online help file.
The source code grid
To see the source code grid, make sure that the source code tab at the bottom of the window is selected. The grid should look something like the following screenshot.
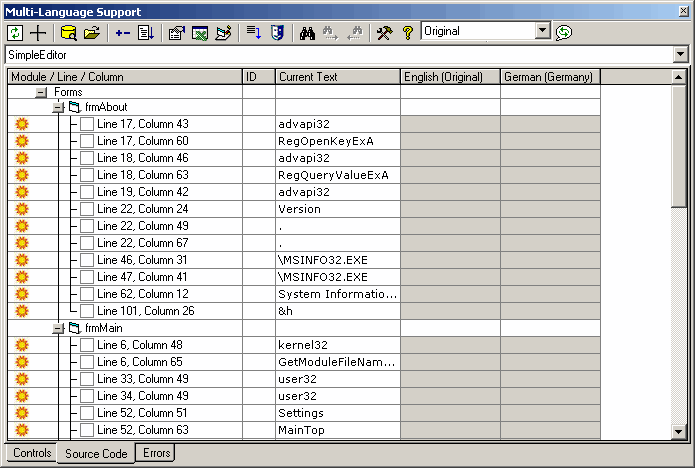
As in the controls grid, you can select a string for translation by clicking in the checkbox to the left of the line number. In contrast to the controls grid however, none of the texts are selected automatically.
|
When you click on a line in the source code grid, the corresponding line in the source code will be shown in the source editor. Alternativly, if you select a line in the source editor, which contains a string, you can locate this line in the source code grid by clicking on the goto line button  on the toolbar.
 |

|

|
Another way to locate a line in the source code grid is to select Show in Multi-Language from the context menu in the source code editor. |
When you select a string for translation by clicking on the checkbox, the Add-In will assign a string ID number to the text and insert a call to the function ml_string() into the source code.

As you can see, this function has two parameters:
- the String ID number and
- the original text
In fact only the string ID will actually be used, so you could consider the original text as a comment. Leaving the original text in the source code serves to make the code more readable. Once a string has been selected for translation, you can enter a translation simply by typing a new text into the grid.
The function ml_string is implemented in the module MlStringModule.bas which was added to the project from a template file (usually in the directory C:\Program Files\MultiLang\Templates).
If you do not select a string for translation, you have the option of hiding the string instead. To hide a strign, we first click on the sun symbol  at the left hand margin. The sun symbol is replaced by a moon symbol
  . At the same time, the comment 'MLHIDE is added to the end of the source code line, to mark it as hidden.

To actually hide the lines, click on the mask symbol on the toolbar  . The hidden items are collapsed behind a new node hidden and you can view them at any time simply be expanding this node.

It is good practice to either select or hide every string in the project. If new strings are added to the source code at a later stage, it is then much easier to find the new strings in the grid. Of course, you can also add the MLHIDE comment to lines in the source code editor. When the Add-In scans the project, it will automatically hide these strings.
Filtering texts with regular expressions
In many cases, you will be able to select, or alternativly hide, texts in the source code based on simple rules. For example you will probably not want to translate SQL strings, or the parameters to an event logging function. On the other hand, you will probably always want to translate the parameters to the MessageBox function.
You can handle operations like this easily with the feature "Filter with regular expressions". You can select this option from the tools menu as shown below, or from the context menu in the source code grid.

This command shows the filter dialog, in which you can enter a search string as a regular expression. For example in the screenshot shown below, the search string '^select ' will search for any string starting with the word select, with the option to hide the string. This is likely to be an SQL statement.

The dialog offers the option to match only the string, or the complete source code line. By matching the complete code line, it is easy to detect strings used in particular function calls, or for example in a select case statement.
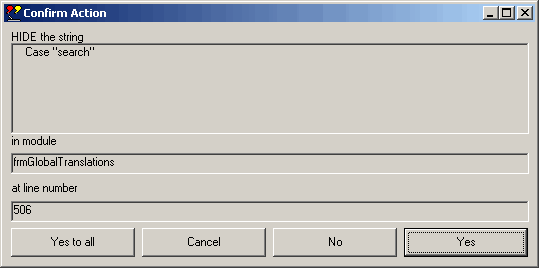
By searching for 'case "' (or perhaps better for '^ *case "') and specifying Compare to source code line, you can detect where a case statement is followed by a string. You will almost certainly want to hide these lines, because to translate them would probably lead to a program error.

When the string is found, the Add-In asks whether the specific string should actually be hidden.
Using the translation memory
Aside from the project database used to store the translations for an individual project, the Multi-Language Add-In also stores all translations in global translations database. When it detects an exact match between a new text and a translation stored in the global database, it will insert the translation automatically. This is great for common terms like OK and Cancel.
If you are able to translate the texts yourself, then the translation memory provides an additional help, based on the translations stored in the global database. To use the translation memory, first click in the cell you want to edit, and then hit F3. The following screenshot shows the translation memory dialog with the text Save the modified project in a different directory, which should be translated into German.
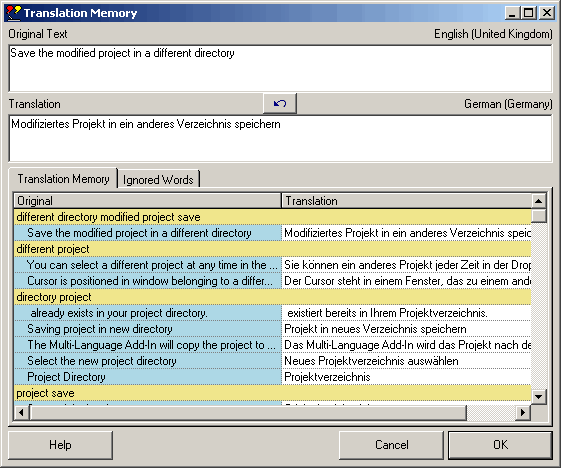
In the lower part of the dialog, there is list of existing translations, containing one or more of the same words as the string to be translated. The list is sorted according to the number of matching words, so the most useful translations should be near the top. You can copy words out of the grid and edit the new translation in the edit box marked Translation.
Obviously, the common words "the", "in" and "a" will not be of much help. If you select the tab Ignored words, you can select the words which are to be ignored. The Add-In keeps a list of ignored words in the global database and automatically ignores these words in future.
The translation memory feature is particularly useful for technical terms where you might not be familiar with the correct translation and where you want to use terms consistently.
Using the Excel export
If you are not able to translate the texts yourself, you will have to give them to a translator. For this purpose you can use the Excel export/import feature. There are two versions of this feature:
- the simple version with one worksheet and no macros
- the three worksheet structured export with macro support
Both versions are accessed via the Excel symbol  on the toolbar.
The screenshot below shows the format of the simple Excel file. As you can see, the first column contains the string ID number, followed by a column for each language. The first two rows contain the language names and the locale ID numbers.
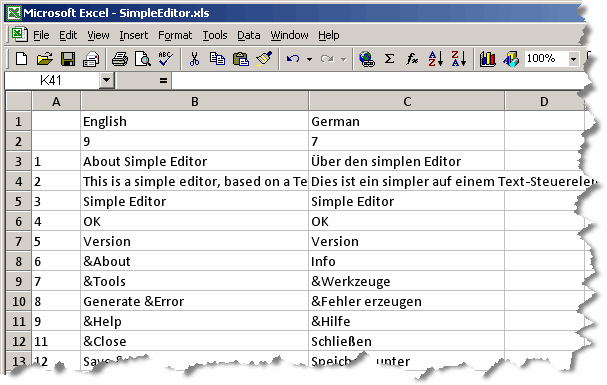
The translator should update texts in the appropriate language column, without changing the format of the file. When the translator is complete, you can import the translations back into the project.
The three worksheet format contains two additional worksheets, which closely resemble the controls grid and the source code grid in the Add-In. These worksheets provide more context information for the translator. Because all texts in the additional worksheets are also present in the third worksheet, Excel macros are used to maintain consistency within the file. The macros also provide some additional functionality, similar to some of the functions provided by the Add-In.
The three worksheet is to be recommended, unless
- your organization is adamantly opposed to using macros or
- the translator wishes to edit the file using OpenOffice.
Using the translations
The last step is to actually create an executable file which uses the translations which have been entered. There are two different fundamental approaches to this. You can either:
- create multiple single-language versions of your program or
- create a single multi-language version of your program.
Creating a single language version
One simple way to use the translations is to compile a separate version of your project for each language. To create a compiled version of your project in a specific language, click on the runtime support symbol  on the toolbar and select Compile single language version from the menu.
 |

|
- create a complete copy of the project in a new directory
- exchange the original texts for the translated texts in the selected language
- compile the new project
- reload the original project
Creating a multi-language version
There are two aspects to creating a multi-language version of your project:
- storing the translated texts as resource strings
- adding runtime support for switching the language
To switch the language, the Add-In generates a function called ml_UpdateControls() in each Form, UserControl or UserDocument to load the localized texts into the properties of controls in the user interface. A call to this function is added to the Form_Load, UserControl_Initialize or UserDocument_Initialize function.
The generated code might look something like the code shown below:
| ml_UpdateControls() | Private Sub ml_UpdateControls() Me.Caption = ml_string(36) cmdOK.Caption = ml_string(37) cmdSysInfo.Caption = ml_string(38) lblDescription.Caption = ml_string(39) lblDisclaimer.Caption = ml_string(42) lblTitle.Caption = ml_string(40) lblVersion.Caption = ml_string(41) End Sub |
| Function call | Private Sub Form_Load() ml_UpdateControls 'Original code ... End Sub |
As you can see, the function ml_UpdateControls() updates the properties of controls, using strings which it retrieves using the function ml_string(). This function will load the resource string with the specified String-ID.
The Add-In's setup dialog contains some options to modify the generated code. To show the setup dialog, click on the settings button  on the toolbar. Details of this and other options are described in the online help file.
In particular, you can specify that the properties should only be updated if the translation is a non empty string. The generated code might then look like this.
| ml_UpdateControls with the option Do not update if string is empty | Private Sub ml_UpdateControls()
Dim TempString As String
TempString = ml_string(36)
If Len(TempString) > 0 Then
Me.Caption = TempString
End If
TempString = ml_string(37)
If Len(TempString) > 0 Then
cmdOK.Caption = TempString
End If
TempString = ml_string(38)
If Len(TempString) > 0 Then
cmdSysInfo.Caption = TempString
End If
TempString = ml_string(39)
If Len(TempString) > 0 Then
lblDescription.Caption = TempString
End If
TempString = ml_string(42)
If Len(TempString) > 0 Then
lblDisclaimer.Caption = TempString
End If
TempString = ml_string(40)
If Len(TempString) > 0 Then
lblTitle.Caption = TempString
End If
TempString = ml_string(41)
If Len(TempString) > 0 Then
lblVersion.Caption = TempString
End If
End Sub |
The option is of practical use when your project has only been partially translated and some translations are simply missing.
Language selection and language switching
The Add-In can add a form to your project, which can be used to select the language. This form can be shown:
- when the program is started or
- at any time when the program is running
The Add-In can add code to your project, to show this form before any other forms are loaded. In this case, the language is selected before any other initialisation code runs.
If you want to change the language at a later stage, then an event mechanism can be used to generate events in all active components, indicating that the language has been changed. The events are generated via a singleton object in the module MLRuntime.dll, which has the great advantage that events can be generated across multiple, separately compiled modules. The Add-In can automatically add the necessary event handlers to support this mechanism. The module MLRuntime.dll can be freely distributed with your application.
Adding runtime support and exporting resources
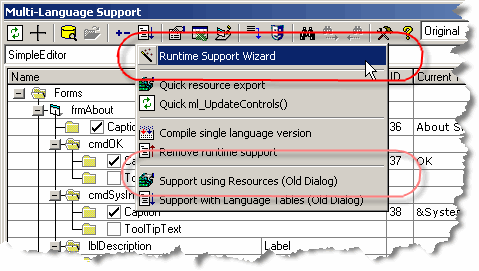
Now we have discussed the basic options, you can go ahead and add the runtime support to your project. Click on the runtime support symbol  on the toolbar and select Runtime Support Wizard from the menu.
This starts a step-by-step wizard in which you can specify various options. At the end, the translations are stored to a resource file and the runtime support code is added to your project. If it is not already present, then a resource file |
|
Note that whenever you make changes to the translations in the Add-In, you must repeat this step, to ensure that the texts are stored in the resource file.