Multi-Language for Visual Studio
Quick Tour (ASP.NET 2.0)
Activating Multi-Language
After you have installed the Add-In, there will be a new menu item in the Tools menu in Visual Studio.
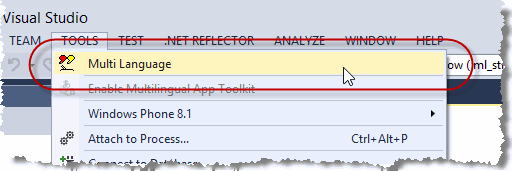
This menu item activates the Add-In and shows it in a tool-window. You can dock this window at the side of the main Visual Studio window, or drag it into a tab group, like other tool windows in Visual Studio. It's probably best to place it at the bottom, in a wide format.
Selecting a project
A Visual Studio solution may contain multiple projects. However, the Multi-Language Add-In always works with a single project. To get started, you must first select the project. There are two ways to do this.
| from a dialog | When you select the Add-In from the tools menu, it will probably show a list of the projects in a dialog. Simply select the project and click on OK. 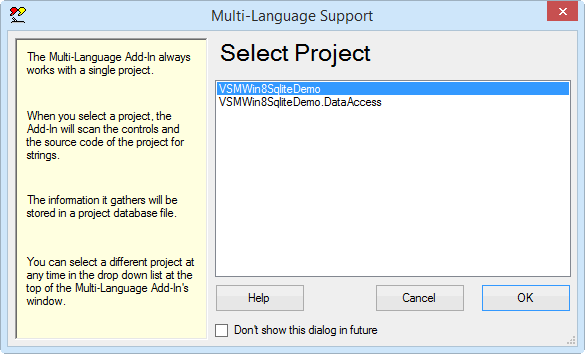
This dialog can be disabled, so if somebody else has already worked with the Add-In, it might not appear. |
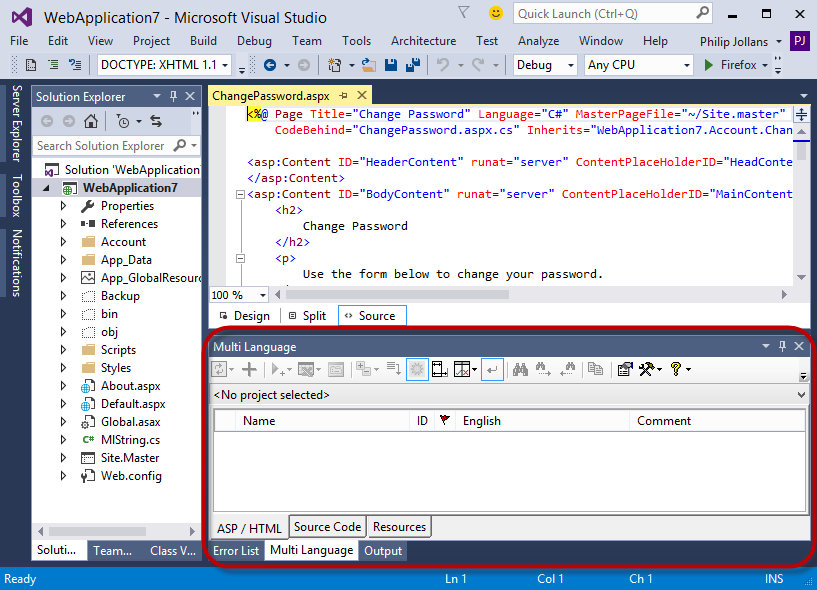
| from a drop down list | At the top of the Add-In's main window, just below the toolbar, there is a drop down project list 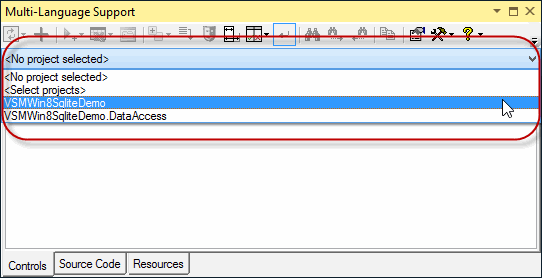
You can select a different project at any time from this list. |
Initialising the project for localization
|
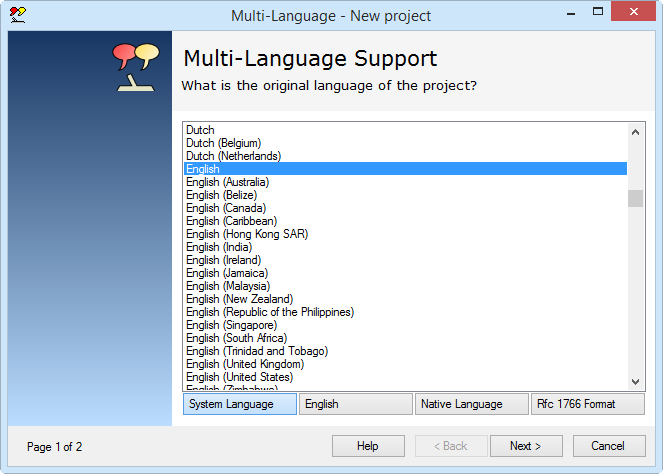
When you select a project for the first time, you must specify what the original language of the project is. Multi-Language will show a list of the languages supported by Windows. Select the original language and click on OK. The buttons below the list change the way the list is displayed. In particular, the button English simply shows the language names in English. It does not select English in the list. |
|
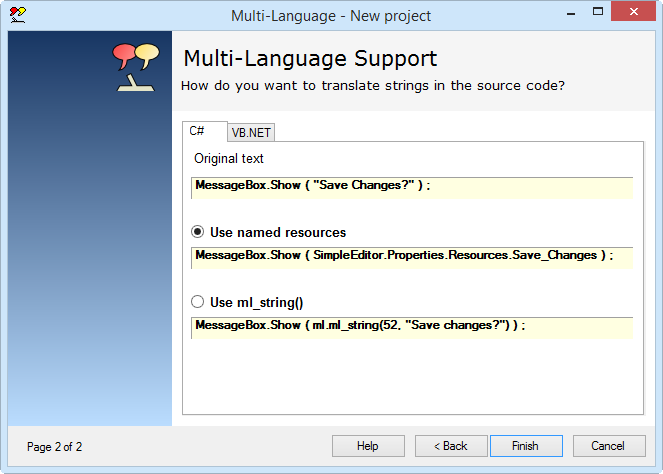
As a second step, you can select one of two ways to handle strings in the source code:
Named resources is the standard method in Visual Studio. This is recommended for new users. ml_string() is a custom implementation used in older versions of Multi-Language. |
|
|
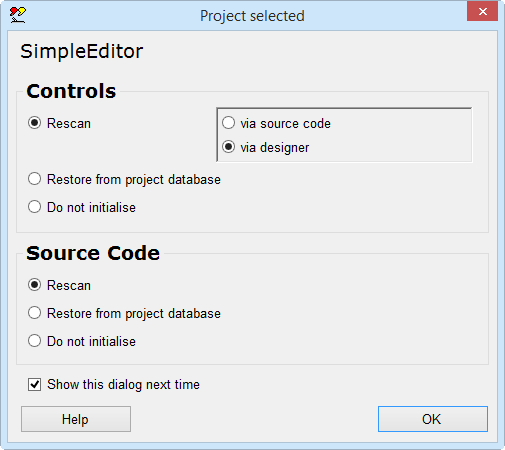
This dialog will probably be followed by second dialog, with options for scanning the project. Just click on OK to accept the default options. |
The Add-In will now add two new files to your project.
| <project name>_ml.xml | This is the project database used by the Add-In. It is added to App_Data subdirectory. |
| mlstring.vb or mlstring.cs | This module contains support functions, in particular the function ml_string(), which is used to load localized strings. It is added to the App_Code subdirectory. |
Scanning the project
The Add-In will now scan the project. This is performed in two phases:
- scanning the HTML and ASP code
- scanning source code
In the first phase, the ASP files are scanned for ASP controls with localizable attributes and for static text in the HTML code. In the second phase, the source code of the project is scanned for texts which may require translation.
|
The results of the scan are displayed in two separate grids in the Add-In's window. You can switch between these grids using the tabs at the bottom of the window. |
Adding a second language
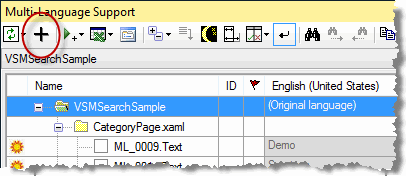
To add a new language to the project, click on the  symbol on the Add-In's toolbar
This brings up a dialog very similar to one where we selected the original language of the project. |
|

|
Select a new language from the list. If the Microsoft Translator supports both the original language and the selected language then the option Get translations from Microsoft Translator is enabled. Select this option if you want the texts to be translated automatically. Click on OK to add this language to the project. |
Some languages, such as German or French, are considered to be neutral languages. The regional variations, such as German(Germany), German(Austria), French(France) or French(Canada) are referred to as specific languages. You should always add the neutral language before adding a related specific language. If you do choose to add a specific language, the Add-In will give you the option of adding both neutral and specific languages or only the neutral language.
After adding the second language, the Add-In will
- add a new column to the grids for the new language
- search for translations of common texts such as OK and Cancel in the Global Translations Database
- if you selected the Microsoft Translator option, then it will translate all other texts online using the Microsoft Translator
Now we will take a closer look at the two grids.
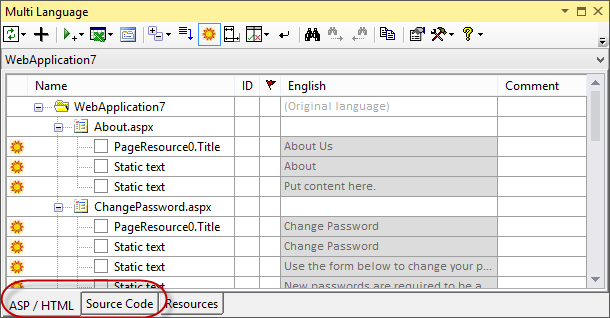
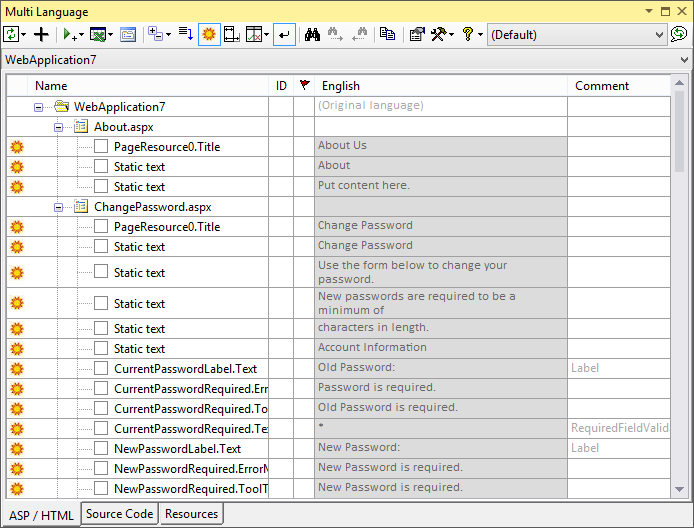
The ASP grid
To see the ASP grid, make sure that the ASP/HTML tab at the bottom of the window is selected. The grid should look something like the following screenshot.
|
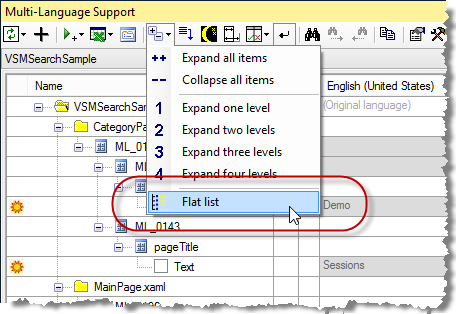
By default, the attributes are shown in a hierarchical manner, showing the association of attributes to controls. As an alternative, you can view the attributes on each ASP page in a flat list. To select this mode, click on the  button on the toolbar and then select Flat list from the menu.
The ASP grid will then look something like the following screenshot. |
|
To the left of the property name there is a check box which indicates whether the property has been selected for translation. Initially, none of the properties are selected. To select a property, simply click on the check box.
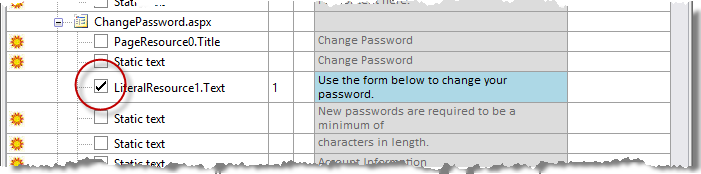
As you can see, the grid has a column for each language in the project. Once a property has been selected, you can enter a translation simply by clicking on the cell in the appropriate column and entering the translation. If you are able to translate the text yourself, this is the easiest way enter translations.
If a text is shown in light grey, then it is the text which would be retrieved at runtime via the resource fallback mechanism. In general, if a text is not defined for a specific language (e.g. Spanish(Mexico)) then the text for the neutral language (e.g. Spanish) would be used. If this has not been defined, then the original text in the project would be used.
When you select a property, the ASP code will be modified, so that the text will be read from a resource file. The exact modification depends on several factors, as described below:
| Attribute of a named ASP control | The attribute meta:resourcekey is added. The name of the resource key is identical to the name of the control. Before <asp:button id="btSearch" runat="server" Width="88px" Text="Search"></asp:button> After <asp:button id="btSearch" runat="server" Width="88px" Text="Search" meta:resourcekey="btSearch"></asp:button> |
| Attribute of an unnamed ASP control | The attribute meta:resourcekey is added. A name for the resource key in the format ML_nnnn is generated automatically. Before <asp:ListItem Value="Ja" Text="Ja"></asp:ListItem> After <asp:ListItem Value="Ja" Text="Ja" meta:resourcekey="ML_0009"></asp:ListItem> |
| Static HTML Text | The text is replaced by an asp:Literal tag. A name in the form ML_nnnn is generated automatically and used as both id and resource key. Before Uw contactgegevens After <asp:Literal ID="ML_0068" runat="server" meta:resourcekey="ML_0068" Text="Uw contactgegevens"></asp:Literal> |
Specifying the attribute meta:resourcekey will cause ASP.NET to initialise the localizable properties of the control from a resource file. The asp:Literal control is the recommended method of localizing static text on an ASP page.
If you select multiple attributes of the same control, the attribute meta:resource key only needs to be added once. If you deselect all attributes of a controls, then the attribute meta:resource will be removed.
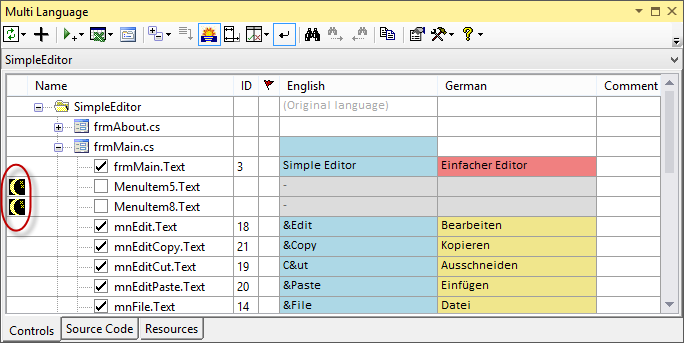
If there are texts which you do not wish to translate, you have the option of hiding these texts, so that they no longer appear in the grid. This is a good practice, because it makes it easier to find new texts when the project is modified. To hide an attribute, we first click on the sun symbol  at the left hand margin. The sun symbol is replaced by a moon symbol
  .
.
To actually hide the lines, click on the mask symbol on the toolbar  . If you want the hidden attributes to be shown again, click on the
button on the toolbar and select ''Show hidden properties" from the menu.
. If you want the hidden attributes to be shown again, click on the
button on the toolbar and select ''Show hidden properties" from the menu.
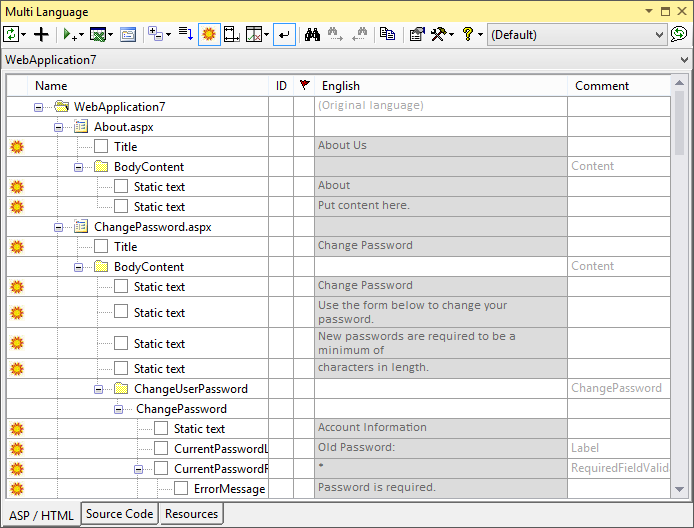
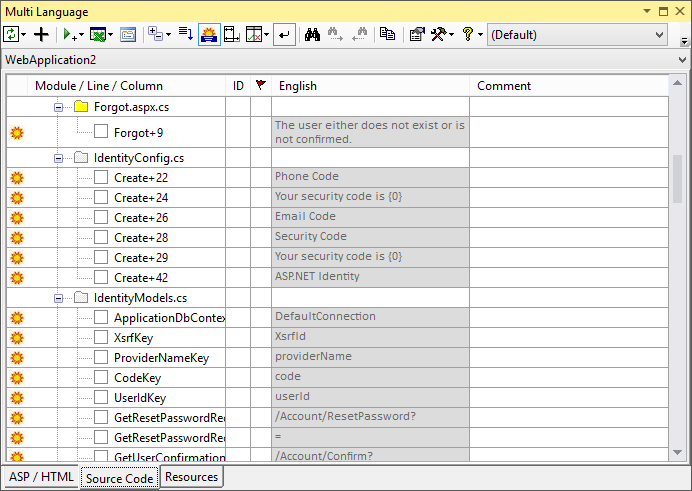
The source code grid
To see the source code grid, make sure that the source code tab at the bottom of the window is selected. The grid should look something like the following screenshot.
As in the controls grid:
- you can select a text for translation by clicking on the checkbox
 or
or
- hide the text by clicking on the sun symbol
.
In contrast to the controls grid however, none of the texts are selected automatically.
When you click on a line in the source code grid, the corresponding line in the source code will be shown in the source editor.
If you click on a text in the source editor with the right (or secondary) mouse button, you can select the command "Show in Multi-Language" from the context menu, which will locate the text in the source code grid.
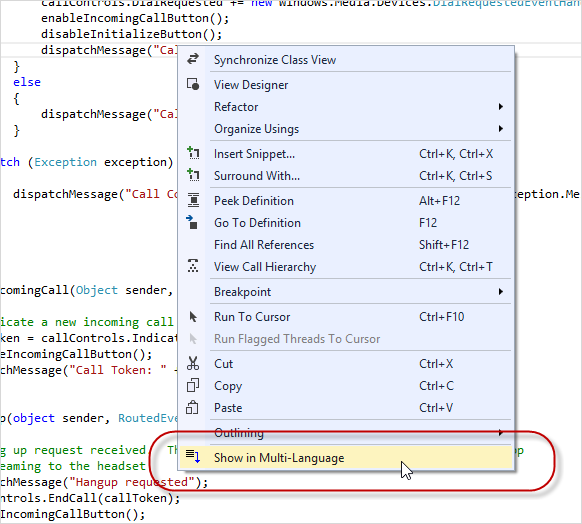
This is identical to placing the cursor on a string and clicking on the "Goto line" symbol  on Multi-Language's toolbar.
When you select a string for translation by clicking on the check-box, Multi-Language will modify the source code in one of two ways.
|
Named resources |
If you selected the option Named resources, then Multi-Language will generate a resource string containing the text. It will then replace the text with a reference to the named resource. 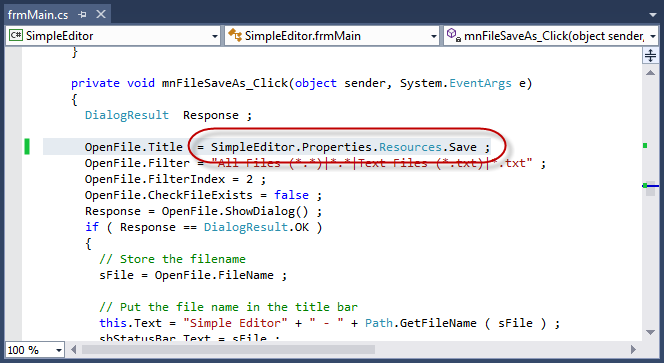
In the screen shot, the text "Save" has been replaced with a resource string named Save. Multi-Language will automatically generate a resource name based on the text itself. Note: After compiling the project, Visual Studio should show the content of the resource string as a tooltip on the resource name, as shown below. 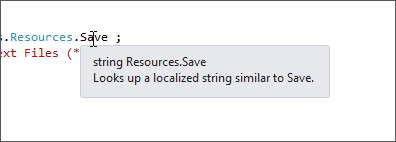
| ||||||
|
ml_string() |
If you selected the option ml_string(), then Multi-Language will assign a string ID number to the text and insert a call to the function ml_string() into the source code.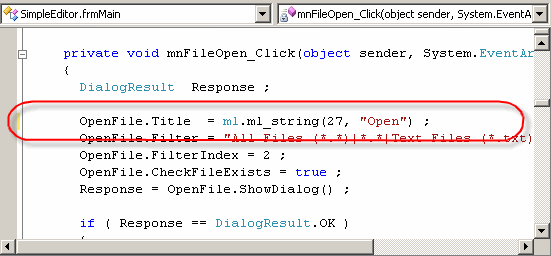
As you can see, this function has two parameters:
The exact format of the function ml_string depends on the computer language used in the project.
The function ml_string is implemented in the module mlstring which was added to the project from a template file. All template files are listed in the Multi-Language options pages. You can make a modified copy of any template file and update the configuration to use your modified version. |
Once a string has been selected for translation, you can enter a translation simply by typing a new text into the grid.
As with the controls grid, you also have the option of hiding texts which do not require translation, by clicking on the sun symbol
at the left hand margin, which is then replaced by a moon symbol
. See also below (Hiding Texts).
Hiding Texts
Hiding texts which should not be translated is an important feature of Multi-Language for Visual Studio.
There are several reasons:
| Dangerous translations | There may be some texts in the source code which must not be translated. In some cases, it will cause a program error is a text is translated. |
| Handling all texts | It is good practice to either select or hide all texts. After further development of your project you may have to review which new texts require translation. If you hide texts which do not require translation, then you will never have to look at them again. If you follow this practice, then any text which is neither selected nor hidden must be a new text. |
To hide a text, simply click on the sun symbol
at the left hand margin. The sun symbol is replaced by a moon symbol
.
You can actually hide these lines by clicking on the sun/moon toggle button
,
,  on the toolbar, which toggles between the modes "show hidden items"
and "hide hidden items"
. (The sunset symbol
indicates a dirty state after additional items have been hidden.)
on the toolbar, which toggles between the modes "show hidden items"
and "hide hidden items"
. (The sunset symbol
indicates a dirty state after additional items have been hidden.)
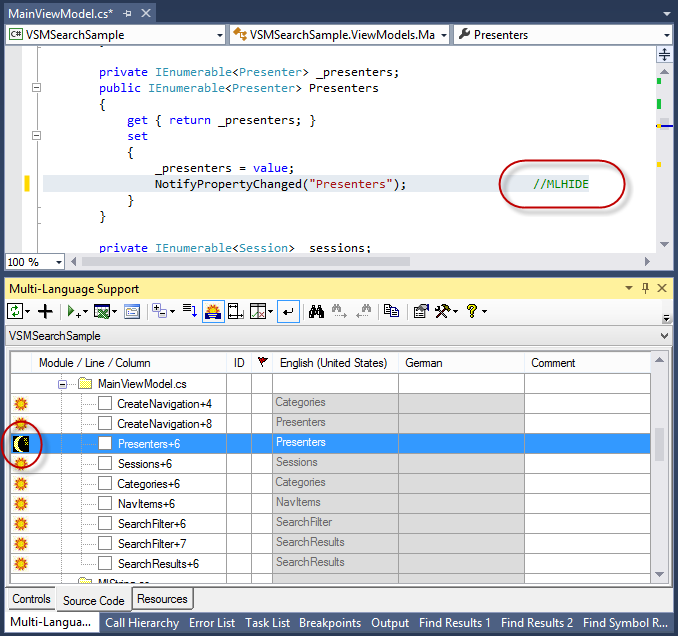
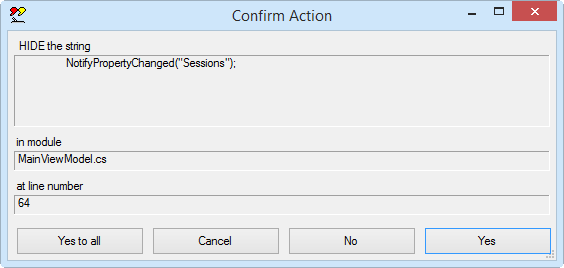
When you hide a string in the source code, Multi-Language adds the comment //MLHIDE ('MLHIDE in VB) to the end of the source code line, to mark it as hidden.
For example, the property name passed to the function NotifyPropertyChanged (in the screen shot below) must not be translated.
The best practice is to go through every text and either:
- select it for translation or
- hide it.
This makes it easier to maintain the localization in future versions of your application, because you can easily identify new texts in the project.
Filtering texts with regular expressions
In many cases, you will be able to select, or alternativly hide, texts in the source code based on simple rules. For example you will probably not want to translate SQL strings, or the parameters to an event logging function. On the other hand, you will probably always want to translate the parameters to the MessageBox function.
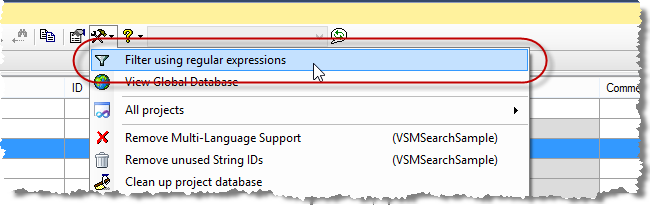
You can handle operations like this easily with the feature "Filter with regular expressions". You can select this option from the tools menu as shown below, or from the context menu in the source code grid.
This command shows the filter dialog, in which you can enter a search string as a regular expression. For example in the screenshot shown below, the search string "^select " will search for any string starting with the word select, with the option to hide the string.
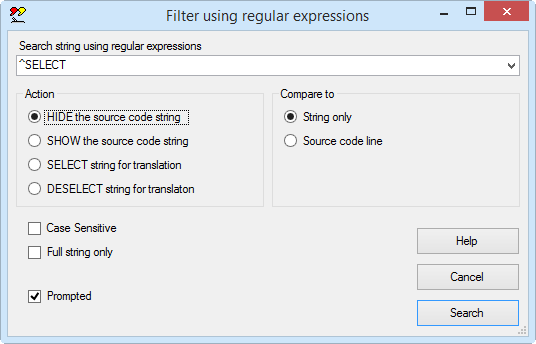
The dialog offers the option to match only the string, or the complete source code line. By matching the complete code line, it is easy to detect strings used in particular function calls.
When the string is found, the Add-In asks whether the specific string should actually be hidden.
Using the translation memory
Aside from the project database used to store the translations for an individual project, the Multi-Language Add-In also stores all translations in global translations database. When it detects an exact match between a new text and a translation stored in the global database, it will insert the translation automatically. This is great for common terms like OK and Cancel.
If you are able to translate the texts yourself, then the translation memory provides an additional help, based on the translations stored in the global database. To use the translation memory, first click in the cell you want to edit, and then hit F3 or F12. The following screenshot shows the translation memory dialog with the text Add a new language to the project, which should be translated into German.
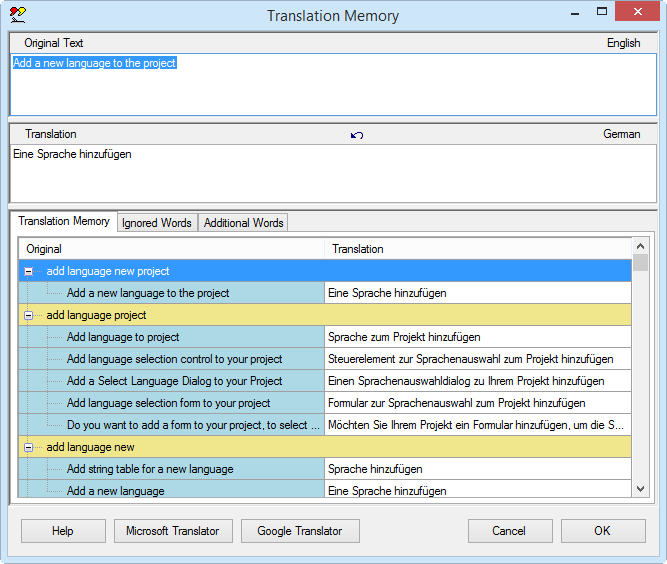
In the lower part of the dialog, there is list of existing translations, containing one or more of the same words as the string to be translated. The list is sorted according to the number of matching words, so the most useful translations should be near the top. You can copy words out of the grid and edit the new translation in the edit box marked Translation.
Obviously, the common words "a", "to" and "the" will not be of much help. If you select the tab Ignored words, you can select the words which are to be ignored. The Add-In keeps a list of ignored words in the global database and automatically ignores these words in future.
The translation memory feature is particularly useful for technical terms where you might not be familiar with the correct translation and where you want to use terms consistently.
Using the Spreadsheet export
If you are not able to translate the texts yourself, you will have to give them to a translator. For this purpose you can use the Excel export/import feature. There are two versions of this feature:
- the simple version with one worksheet and no macros
- the three worksheet structured export with macro support
Both versions are accessed via the Excel symbol  on the toolbar.
The screenshot below shows the format of the simple Excel file. As you can see, the first column contains the string ID number, followed by a column for each language. The first two rows contain the language names and the locale ID numbers.

The translator should update texts in the appropriate language column, without changing the format of the file. When the translator is complete, you can import the translations back into the project.
The three worksheet format contains two additional worksheets, which closely resemble the controls grid and the source code grid in the Add-In. These worksheets provide more context information for the translator. Because all texts in the additional worksheets are also present in the third worksheet, Excel macros are used to maintain consistency within the file. The macros also provide some additional functionality, similar to some of the functions provided by the Add-In.
The three worksheet is to be recommended, unless
- your organization is adamantly opposed to using macros or
- the translator wishes to edit the file using OpenOffice.
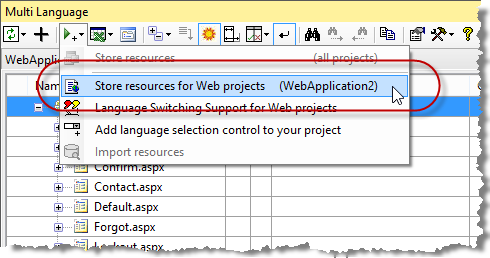
Exporting the texts to resource files
|
In order to actually use the translations in your project, it is necessary to export them to resource files in the ResX format. To do this, click on the runtime support symbol  on the toolbar and select the command Store resources for web projects from the dropdown menu.
 |
|

|
When it is completed, you will see in the solution explorer window, that a number of ResX files have been added to your project. In each case, there are
The language is encoded as
The App_GlobalResources directory contains the file MultiLang.resx. This file contains all strings managed by the Add-In, and is used by the function ml_string(). The App_LocalResources directory contains a local resource file for each ASP page. This file is used by ASP.NET to load resources specified using the meta:resourcekey attribute. If ASP pages are stored in more than one directory, then each one will have its own App_LocalResources subdirectory. |
Getting it working
An ASP page has two properties to set the culture
| UICulture | This property sets the language. |
| Culture | This property affects regional settings, such as the currency symbol, but not the language. This property must be set to a specific culture (e.g. "en-UK") and not to a neutral culture (e.g. "en"). |
To set the language, we are only really interested in the UICulture property, but it may make sense to set both properties.
For a quick test, you can "hard code" the language into the .aspx page, by setting the UICulture property in the Page directive, e.g.
<%@ Page UICulture="fr" %>
Of course, this should be in addition to any other attributes already present in the Page directive. You can achieve the same result by setting the UICulture property in InitializeCulture method, e.g.
| VB.NET | Copy to clipboard
|
| C# | Copy to clipboard
|
The more usual approach would be to set both the Culture and UICulture to the special value "auto", e.g.
<%@ Page Culture="auto" UICulture="auto" %>
In this case, the UICulture property will be set to a default language defined by your browser. All of the common browsers allow you to define one or more preferred languages for web pages. For test purposes, you can modify the language preference and reload the page. (For Firefox there is a "Quick Locale Switcher" extension, which makes it easier.)
Switching the language of the active page
You may like to give users the possibility to change the language of you web site interactively.
You can add a drop down language list to your ASP pages, in the following three steps.
Step 1 - Add support functions
|
Click on the runtime support symbol
on the toolbar and select the command Language Switching Support for Web projects from the dropdown menu. |
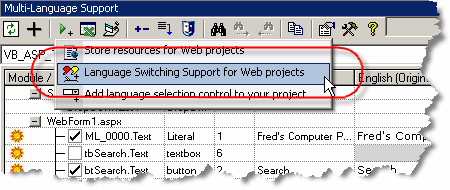
|
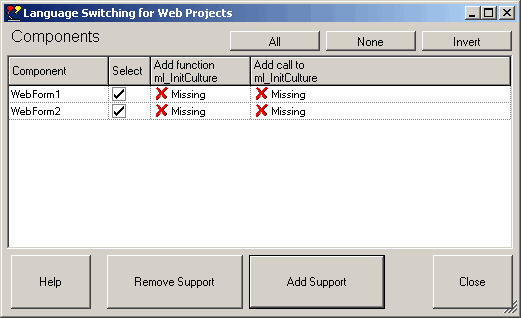
|
This will bring up a dialog showing a list of the ASP pages in your project. Click on Add Support to add the support functions. This will add the following code to your ASP pages. |
| VB.NET | Copy to clipboard
|
| C# | Copy to clipboard
|
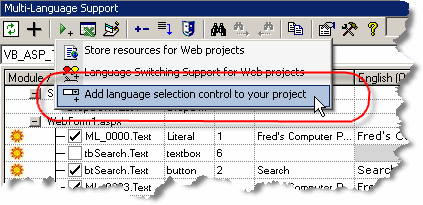
Step 2 - Add the Select Language Web UserControl
|
Click on the runtime support symbol
on the toolbar and select the command Add language selection control to your project from the dropdown menu. This command copies the Web UserControl SelectLanguage.ascx to your project, based on template files. This user control is simply a drop down list with code to:
|
|
Step 3 - Place the UserControl onto your ASP page
|
To use the language selection control, all you have to do is to drag it from the solution explorer... |
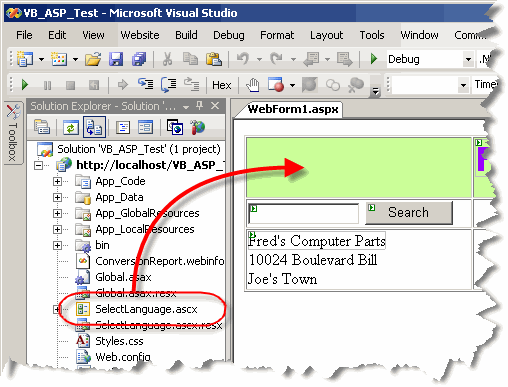
|
|
... and drop it onto the designer window for your ASP page. |
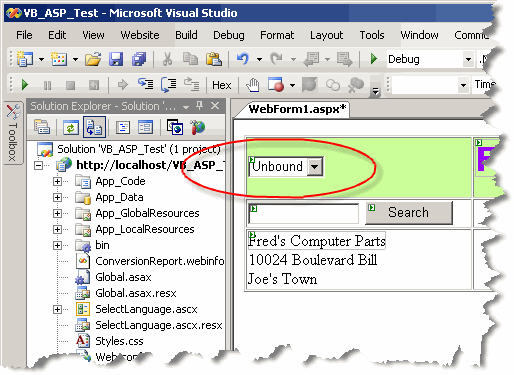
Step 4 - Try it out
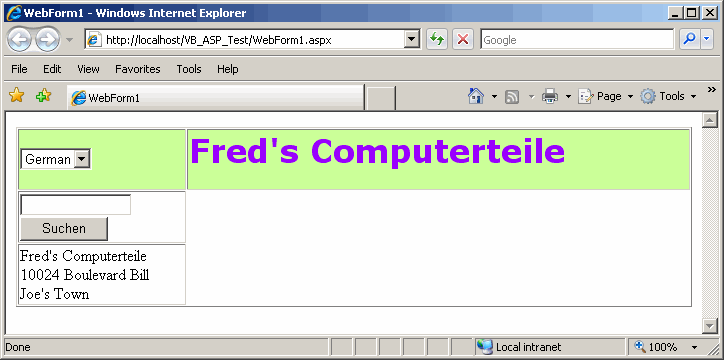
When you view your ASP page in a browser, you should see a drop down list of languages.
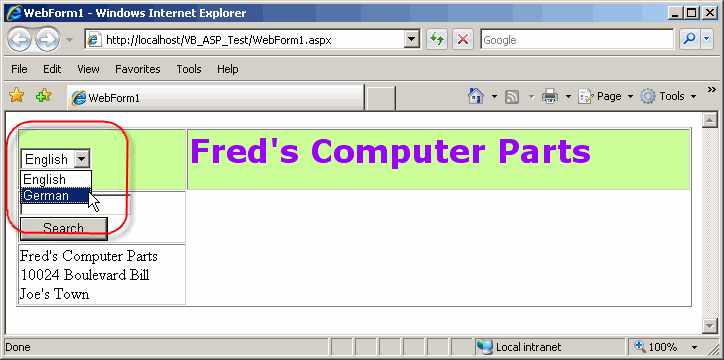
When you select a different language, the ASP page is reloaded using the selected language.